Tile Water Absorption Groups and How They Determine Installation with Thinset or Mortar
Tile and porcelain products vary not only in color and texture but also in how much water they absorb. This water absorption rate is one of the most important technical characteristics in determining how tiles should be installed—whether with modern thinset adhesive or traditional cement mortar.
In this complete technical guide, we explain what tile water absorption groups are, how they are classified under EN 14411 / ISO 13006, and why understanding them ensures a durable, long-lasting tile installation.
?What Is Tile Water Absorption
Every ceramic or porcelain tile has a certain level of porosity in its body. The more dense the tile, the less water it absorbs. This porosity directly affects how well an adhesive or mortar can bond to it.
Simply put, low absorption = dense body = high strength but lower bonding with cement-based mortars.
That’s why porcelain tiles, with less than 0.5% absorption, must be installed only with thinset adhesives, not mortar.
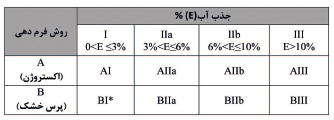
EN 14411 / ISO 13006 Classification
According to international standards, all tiles are divided into groups based on manufacturing method and water absorption rate.
Codes such as B I a or A II b identify both the production process and the absorption level.
Understanding the Code Structure
| Code Element | Meaning |
|---|---|
| A / B | Production method: A = Extruded, B = Dry-pressed |
| I / II / III | Water absorption range: I = low, II = medium, III = high |
| a / b | Subcategory within the same absorption group |
Full Table of Water Absorption Groups
| Group | Production Method | Water Absorption (%) | Body Type | Typical Application | Recommended Installation |
|---|---|---|---|---|---|
| A I a | Extruded | ≤ 0.5% | Dense porcelain | Floor, wall, exterior | Thinset C2TE only |
| A I b | Extruded | 0.5% – 3% | Semi-porcelain | Wall, floor | Thinset C1/C2 |
| A II a | Extruded | 3% – 6% | Compact ceramic | Dry areas | Thinset or mortar |
| A II b | Extruded | 6% – 10% | Regular ceramic | Interior walls | Mortar |
| A III | Extruded | >10% | Highly porous wall tile | Interior wall | Mortar only |
| B I a | Dry-pressed | ≤ 0.5% | Porcelain / Full-body | Floor, facade, slabs | Thinset C2TE S1 only |
| B I b | Dry-pressed | 0.5% – 3% | Semi-porcelain | Wall/floor | Thinset C2 |
| B II a | Dry-pressed | 3% – 6% | Low-absorption ceramic | Dry floor/wall | Thinset or mortar |
| B II b | Dry-pressed | 6% – 10% | Normal ceramic | Interior wall | Mortar |
| B III | Dry-pressed | >10% | Highly porous wall tile | Interior wall | Mortar only |
A vs. B Manufacturing Methods
A (Extruded):
Clay is pushed through a mold under pressure, resulting in thicker and more porous tiles.
Typical use: brick-like tiles, rustic facades, and classic exterior ceramics.B (Dry-Pressed):
Dry powder is pressed into molds under high pressure. The body becomes denser and dimensionally stable.
Typical use: porcelain tiles, full-body slabs, and modern ceramics.
Why Absorption Affects the Choice of Adhesive
Group I (Low Absorption)
Water absorption ≤ 0.5%
Dense, impervious body structure
Cannot absorb water from traditional mortar → poor bonding
Must be installed using polymer-modified thinset (C2TE or C2TES1).
Examples: Porcelain tiles, full-body slabs, outdoor tiles.
Group II (Medium Absorption)
Water absorption 3–10%
Can bond with both thinset and mortar, depending on environment.
For wet or high-traffic areas → thinset recommended.
For dry interior walls or small ceramics → mortar acceptable.
Group III (High Absorption)
Water absorption >10%
Porous wall tiles that easily absorb water from cement mortar.
Can be fixed using traditional cement mortar, but thinset improves adhesion and durability.
Installation Guidelines by Group
Groups A I & B I (Porcelain)
Always use C2TE or C2TES1 thinset.
Apply double spreading technique (on both substrate and tile).
Use vibration tools to eliminate air pockets.
For exterior facades, flexible thinset with S1 classification is mandatory.
Group B II (Ceramic Tiles)
In dry areas, traditional mortar is acceptable.
For improved adhesion, add latex or polymer additives.
In wet zones (bathrooms, terraces), always use C2 adhesive and waterproof membranes.
Group B III (Wall Tiles)
Soak tiles in water before installation to avoid premature mortar dehydration.
Use a fine-grain cement-sand mix.
On gypsum or painted walls, switch to thinset for better grip.
Common Mistakes Installers Should Avoid
Using mortar for porcelain tiles — leads to debonding and hollow sounds.
Wrong adhesive type — C1 for internal walls only; use C2TE S1 outdoors.
Ignoring absorption classification — causes cracks, detachment, and water damage.
No waterproof layer under tile — shortens lifespan even with good adhesive.
How to Measure Water Absorption (ISO 10545-3)
Weigh the dry tile.
Boil it in water for 2 hours.
Dry the surface and weigh again.
Calculate:
Water Absorption (%) = (Wet weight – Dry weight) ÷ Dry weight × 100
This determines whether a tile belongs to Group I, II, or III.
Adhesion vs. Absorption
Low absorption tiles delay adhesive drying; polymer additives are necessary.
High absorption tiles quickly draw moisture; mortar must be properly hydrated.
Correct adhesive selection ensures mechanical and chemical bonding for long-term durability.
Frequently Asked Question
Can B II b tiles be installed with thinset?
Yes. Using a C1 or C2 thinset provides better adhesion and easier leveling than mortar, especially on smooth or painted substrates.
Summary Table
| Group | Absorption | Tile Type | Recommended Installation |
|---|---|---|---|
| A I / B I | ≤ 0.5% | Porcelain, slabs | Thinset C2TE |
| A II / B II | 3–10% | Ceramic | Thinset or mortar |
| A III / B III | >10% | Wall tile | Mortar |
Professional Recommendation from Charisma Tile
At Charisma Tile, we emphasize:
“Knowing your tile’s absorption group is the first step to a successful installation.”
Whether you are installing porcelain slabs, full-body tiles, or wall ceramics, choosing the correct thinset based on absorption ensures perfect adhesion, durability, and beauty.
Charisma Tile manufactures a full range of C1, C2, T, E, and S1 adhesives that comply with EN 12004 standards, offering:
Excellent workability
Superior adhesion strength
Resistance to humidity and thermal shock
Installer’s Checklist
Always verify the absorption group on the packaging or technical sheet.
When in doubt, use C2 adhesive for maximum safety.
For wet or outdoor areas, combine C2TE S1 thinset with a two-component waterproofing membrane.
Use Charisma leveling systems, suction cups, and vibrators for perfect slab installation.
Final Note
If you’re unsure which adhesive or installation method best suits your tile type,
Charisma Tile has the solution.
Contact our specialists at +98 21 9109 3614 or visit www.charismatile.com